
Cat Cylinders

Supplies List
- Walkers School Earthenware Stoneware (SES) Clay 10kg
- Pottery Tool Kit 8pc
- Fettling Knife
- Artist Paint Brush Set
- Synthetic Silk Sponge 2pk
- Mayco Designer Liner Kit 37ml
- Mayco Stroke and Coat Kit #1 473ml
- Mayco Stroke and Coat Kit #2 473ml
- Mayco Stroke and Coat Kit #3 473ml
- Ceramicraft Underglaze Pencil 01 Black
- Fineline Applicator Bottle 30ml 3 Pack Variety
- Amaco Underglaze Applicator Bottle 16ga
Instructions
In the tradition of Laurel Burch and Mayco, follow step-by-step instructions to create your own personalized sculpture, and discover your inner Cattitude along the way! Brainstorm what is unique about Laurel’s style and produce lines, texture and pattern ideas, using Mayco’s Stroke & Coat® glazes capturing the colorful, playful details. These glazes are a highly versatile with a wide firing range and can be used in every decorative way imaginable!
Clay Building Process:

- Create a cylindrical vessel with the Broomstick Method using a set of dowel rods with graduating thicknesses. Wedge 2 pounds of clay and slap it into a rough cylinder shape about the size of a soda can. Skewer the center of the cylinder with the smallest dowel. To establish a straight channel through the clay, it may be easier to poke through both sides and meet in the middle.
- Holding both sides of the dowel, roll the clay like a rolling pin. As the hole widens, swap the dowel rod for a thicker one and continue rolling. Repeat this step until a cylinder with ¼” walls have taken shape.
- Using gentle pressure with a damp sponge, pressing in from the outside and pressing out from the inside to close the top. When satisfied with the shape, set the piece on top of a slab to mark the floor. Cut the floor shape and attach it to the cylinder using the slip and score method. Compress the underside with a rib to prevent cracking and weld the seam upwards. Cut an optional hole in the top.
- Continue to work with clay to create a head shape by slipping and scoring the top of the cylinder together. Then, cut it in two to create ears.
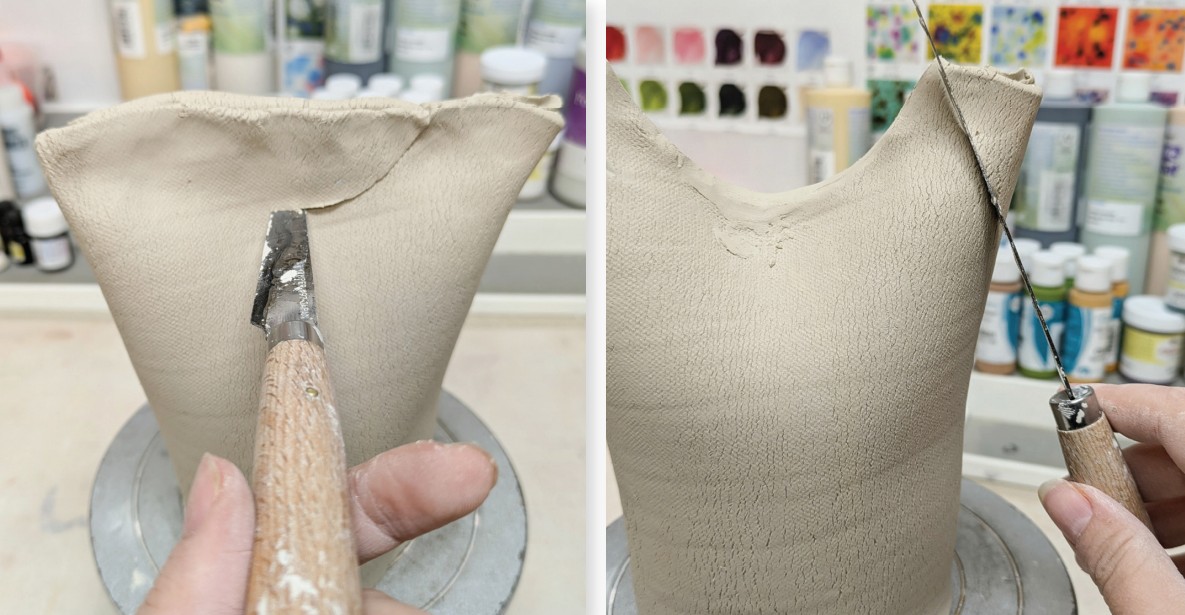
- After cutting cat ears from the top of the cylinder, carve the cat pattern using a carving tool or dull pencil. Clay carving is best done in the leather-hard stage. Allow clay scraps to dry and sweep away with a fan brush.
- Add cat feature details, lines and patterns until you have created your own unique cat in the style of Lauren Burch
- Allow to dry thoroughly and fire to cone 04.
Decorating Process:
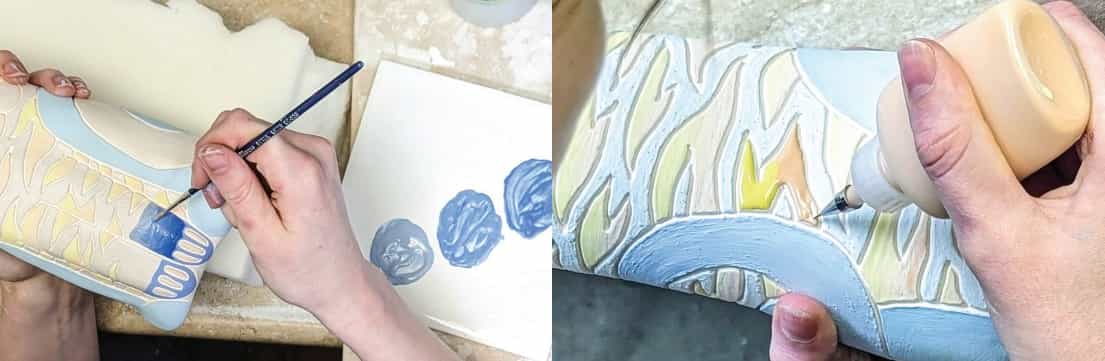
- Create transition colors directly on the piece. Fill two writer bottles with two glazes and apply them side by side. While still wet, blend the glazes where they meet using a brush.
- Create patterns with a marker to guide application. When fired to midrange temperatures, Stroke & Coat will blur if colors are layered or overlapped. Use this feature to create diffused patterns.
- Allow to dry and fire to appropriate temperature for clay body used.
You can purchase glaze colours in a kit or individual bottles to suit your design choices.
Download Lesson Plan PDF: Cat Cylinders - Clay Lesson Plan
×
![]()
Copyright © 2026 Ceramicraft All rights reserved.
We accept:


