
Picasso Inspired Wall Sculpture

Supplies List
- Walkers School Earthenware Stoneware (SES) Clay 10kg
- Pottery Tool Kit 8pc
- Fettling Knife
- Wire Texturing Brush
- Artist Paint Brush Set
- Mayco Designer Liner Kit 37ml
- Ceramicraft Underglaze Pencil 01 Black
- Mayco Stroke and Coat SPKIT Speckled (12 x 473ml)
- Mayco Jungle Gems Glaze Assortment Kit 118ml
- Mayco Stroke and Coat Kit #3 473ml
Instructions
Create a Cubist-inspired wall hanging sculpture that captures the essence of Picasso’s abstraction while showcasing individual creativity. Use slab construction and geometric abstraction to bring sculptures to life and a combination of glazes including glossy, matte and transparent glazes to add texture, colour, and depth. This fun activity is designed for teachers providing clay lessons in school or studio's running classes and want to expose lots of glaze options and techniques!
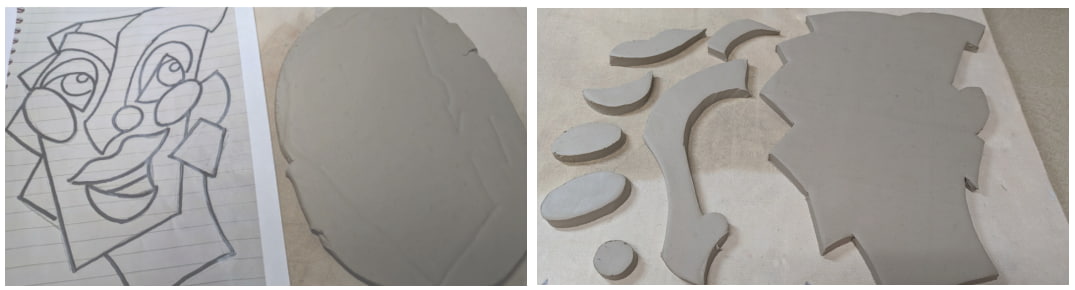
Begin by showing examples of Picasso’s Cubist artwork, focusing on geometric shapes and abstract forms. Sketch ideas, breaking down faces, objects, or scenes into basic geometric shapes like squares, triangles, and circles. Wall hangings should be flat with a focus on shape, texture and pattern.
Clay Building Process:
- Roll out clay slabs to the desired thickness (about 1/4 inch). Cut out geometric shapes based on sketches, using a ruler and templates to maintain uniformity and precision.
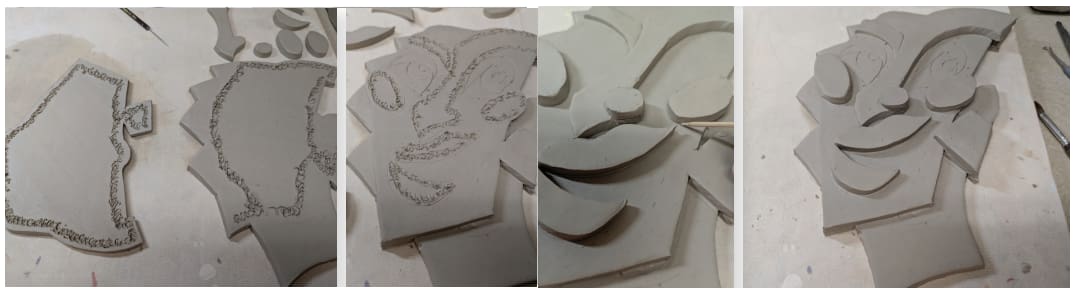
- Scratch and attach the middle layer slab to the bottom layer slab. Apply slip or water to the areas being attached. Use scoring and slipping techniques to attach pieces and ensure they stick together. Use a clay knife or needle tool to cut out the shapes and then score the edges of the slabs where they will be joined
- Once the basic form is assembled, carve into the clay, adding texture and detail to enhance the Cubist effect. This might include abstract lines, fragmented facial features, or geometric patterns. Gently brush any small shavings away with a soft brush as the piece dries. Ensure that the surface is smooth and refined to prepare for glazing.
- Allow the pieces to slowly dry. Once dry, bisque fire at cone 04 the ceramics in the kiln to prepare them for glazing.
Glazing:
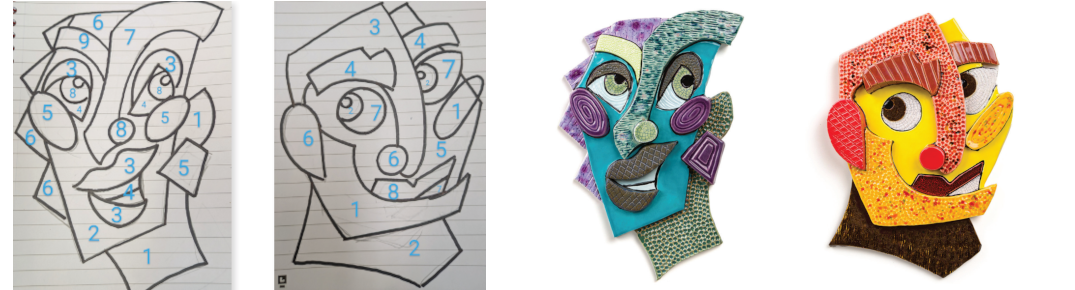
- Use a variety of glazes available (glossy, matte, transparent, underglaze, speckle) discuss how each can be used creatively. Apply a combination of glazes to your pieces, experimenting with different finishes and layering techniques. Mixing colours and experimenting with textures.
- Apply three layers of all glazes on all sections using an appropriately sized brush for the area. Once the glaze has been applied, fire the pieces in the kiln again to bring out the colour and finish of the glazes. Remember to check the glaze and clay used to determine your firing range.
A great project for those with a variety of glazes to use up, just make sure they are all compatible and of the same firing range.
Download PDF: Picasso Inspired Wall Sculpture - Clay Lesson Plan

